The shape of this geometric origami is called ‘Triangular Bipyramid’. I know, a bit tricky for kids, but the origami itself is the easiest to make and has many fun uses.
To remember this name is actually straight forward. Bipyramid means two pyramid shapes mirrored back to back, and this pyramid has triangular sides, so there you go.


Here’s how:

Cut a strip of paper with an even width. The width and length should be at least 1:4 or 1:6.
I just cut a rough length that looks long enough and adjust the final length as I make it.
Fold a small triangle on one end.

Fold backward at the end of the triangle and repeat fold like an accordion.

Fold the straight lines between the diagonals again to change the fold direction.

Form the ‘Triangular Bipyramid’ by rolling the shape along.

Wrap around the faces a couple of times to form a solid shape, trim off the end triangle and insert the final triangle part into a slit to close it up.

Ta-da!
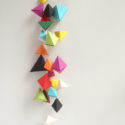
Now, here are a few fun ideas using this origami.
Make them in many colored papers and in many different sizes!

You can string them easily by taking out the last triangular piece, placing a string through and closing it up again. Or use a big needle and thread.

Make a fun play time necklace!

Hang them as room decorations.

Make pretty garlands, a backdrop for a party or build mobiles.

Use them for a rainbow color sorting game.

Or color & size sorting!

You can put small sweets inside and close up. I tried putting the same colored little treats in each rainbow color shape. A cute rainbow party favor I think!
Enjoy!

This is so cool!! 😀
I love this origami
Help! I’m stuck after the accordion, I think I’m overcomplicating this… haha I keep ending up with a 6 sided shape!
Hi Andrea, I think you’re doing it correctly, because it is a 6 sided shape! This triangular pyramid has 3 faces on each side. Maybe it looks simpler than you imagined! Hope you enjoy them : )
This is just so darn cute! Pinning also and following. Linda
I’d love to have this linked to What to do Weekends also.
http://www.craftsalamode.com/2013/03/what-to-do-weekends-10.html
i just went to buy some colored papers! i loved it so much!
These are fabulous! The colors… the shapes… so pretty! I’d like to make them to hang around my office!
These are also known as crane eggs, and you can even buy paper specially made for folding them!
So adorable! I’m making these now. How did you keep the triangles suspended on the string for the mobile without having them all slip down to the end of the string? Thanks!
Thanks Jane! When I made them some slipped down but most didn’t so I just left them as they were. (I used a slightly chunky thread.) But I think you could just make a knot after the shape, or use tape inside the flap (the last bit) which won’t show when you close them up. Enjoy!
Oh my! These are gorgeous. love them.
so, cool, I will put treats in them and use them as a fun start to our Ancient Egyptian home school study unit and they can make the necklaces. I love your ideas.
Hello! Im stuck in the accordion. HELP! This is really gorgeous, Im trying to do the necklace (:
I can’t fold it to the bipyramid 🙁
the directions are not as clear as they should be….I think this should be a step by step YOU TUBE instead
Any recommendation for paper weight for making these? or is 80g ok?
oh you must discribe this tutorial a little bit better. i dont know how todo? do you know an youtube tutorial? i want to make this triangle but it doesnt work…. for me….
I am stuck at the accordion as well 🙁
I like this idea! However, I am stuck trying to fold it… are there better instructions for this? Please help!
Hello admin! I know this is an old post but I think It’s amazing and I really want to craft it but I can’t see any tutorial pics. please help me!!